Goals
 The purpose of this lab was to provide an introduction to an important image preprocessing exercise, namely geometric correction. Geometric correction is performed on satellite images as a part of preprocessing activities prior to the extraction of biophysical and sociocultural information from the images. There are two major types of geometric correction, image-to-map rectification and image-to-image registration, both of which were explored in this lab.
 Methods
Image-to-Map Rectification:
During the first part of this lab, I geometrically corrected an image using image-to-map rectification in Erdas Imagine 2015. To do this, I first opened both the image to be rectified and the reference image in Erdas Imagine. Then, I navigated to raster processing tools for multispectral imagery and used the Control Points function to begin the geometric correction process. After this, I set the geometric model to Polynomial. For this exercise, I ran a 1st order polynomial transformation.
Then, I began to the process of adding Ground Control Points (GCPs) to both of the images using the Create GCP tool. The number of required GCPs varies depending on the extent of geometric distortion present in an image; moderate distortion only requires affine (linear) transformation and fewer GCPs while more serious geometric distortion requires higher order polynomial transformation and more GCPs (Figure 1). Since this exercise involved a 1st order polynomial transformation, a minimum of 3 pairs of GCPs were necessary. For this lab, however, I added four pairs of GCPs. After adding the third pair of GCPs, the model solution changed from reading "model has no solution" to "model solution is current" because the necessary number of GCPs was achieved. When adding points, I tried to place them in distinctive locations that could be easily found on both the image to be rectified and the reference map. I also tried to evenly disperse my GCPs throughout the images.
After placing all four pairs of GCPs, I evaluated their accuracy by examining the Root Mean Square (RMS) error. The total RMS error is indicated in the lower right hand corner of the Multipoint Correction Window. The ideal RMS error is .5 and below, however, for this lab, mine only needed to be below 2.0. To achieve this, I made small adjustments to my GCPs' locations until my error dipped below 2.0 (Figure 2). Once my total RMS error had been reduced, I performed the geometric correction using the Natural Neighbor resampling method by clicking the Display Resample Image Dialog button. This created a rectified output image (Figure 4).
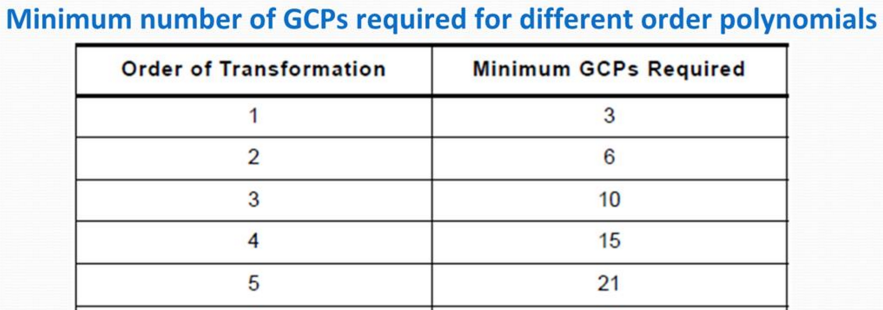 |
| Figure 1: table indicating GCP requirement for different order polynomials |
 |
| Figure 2: image-to-map registration geometric correction process in Erdas Imagine; image to be rectified is on the left and reference map is on the right; RMS total error = .7275 |
Image-to-Image Registration:
During this part of the lab, I geometrically corrected an imaged using image-to-image registration in Erdas Imagine 2015. This involved essentially the same process that I outlined above for image-to-map rectification, except this time I used a previously rectified image for a reference instead of a map. For this exercise, I performed a 3rd order polynomial transformation, so a minimum of 10 GCPs were required, though I added 12 GCPs. After adding all 12 GCP pairs, I once again evaluated my geometric accuracy by assessing the RMS total error. Upon achieving a total RMS error under 1.0, I moved on to the geometric correction process. This time, I used the Bilinear Interpolation resampling method to geometrically correct the image by clicking the Display Resample Image Dialog button. This produced a rectified output image (Figure 5).
 |
| Figure 3: image-to-image registration geometric correction process in Erdas Imagine; image to be rectified is on the left and reference image is on the right |
Results
The results of my methods are displayed below.
Image-to-Map Rectification:
 |
| Figure 4: unrectified image on left; rectified image on right |
Image-to-Image Registration:
 |
| Figure 5: unrectified image on right; rectified image on left |
Sources
Satellite images. Earth Resources Observation and Science Center, United States Geological Survey.
Digital raster graphic (DRG) from Illinois Geospatial Data Clearing House.
No comments:
Post a Comment